Windows Tips, Tricks and Notes
Windows 10 annoyances and how to overcome them
"Let's finish setting up your device." Let's not and say we did:
Disable this annoying splash screen thusly:
- Start → Settings → System → Notifications & actions
- Uncheck the “Show me the Windows welcome experience after updates…”, “Suggest ways I can finish setting up my device…” and “Get tips, tricks and suggestions…” items under Notifications.
End the automatic upgrade/automatic reboot madness
Open the Group Policy Editor (gpedit.msc)
Navigate to the following path:
Computer Configuration > Administrative Templates > Windows Components > Windows Update
Change the following 3 settings:
Configure Automatic Updates → Enabled, 4 - Auto download and schedule the install
Configure auto-restart required notification for updates → Enabled, 2 - User Action
No auto-restart with logged on users for scheduled automatic updates installations → Enabled
Require username to be specified at logon (disable user listing)
Open the Local Policy app (secpol)
Navigate to Security Settings → Local Policies → Interactive Logon: Don’t display last signed-in and set to Enabled.
Enable ICMP
Open a command window in Administrator mode and enter the following command:
netsh advfirewall firewall add rule name="ICMP Allow incoming V4 echo request" protocol=icmpv4:8,any dir=in action=allow
Disable "helpful" reminders to login to a Microsoft Account (insert puke emoji here)
Open the Group Policy Editor
Navigate to User Configuration → Administrative Templates → Windows Components → Account Notifications
Set Turn off account notifications in Start to Enabled
How Windows determines whether or not the machine has internet access
Windows attempts to download a file from a dedicated Web server. Depending on which version of Windows, it’s http://www.msftncsi.com/ncsi.txt or http://www.msftconnecttest.com/connecttest.txt. If the download is successful and contains the correct contents, then Windows concludes that you have full Internet access.
If something goes wrong, Windows will report either limited or no Internet access, depending on what exactly went wrong.
More details on this are available here.
Personalizing a non-activated Windows 10 system
Disable Taskbar Button Grouping with Group Policy
Open the Registry Editor app and locate the following registry key:
HKEY_CURRENT_USER\Software\Microsoft\Windows\CurrentVersion\Policies\Explorer
On the right, create the new 32-Bit DWORD value NoTaskGrouping
Set the value of the newly created key to decimal 1.
Restart the computer.
Setting Desktop Wallpaper via Group Policy
Open the Group Policy Editor (gpedit.msc)
Navigate to Local Computer Policy → User Configuration → Administrative Templates → Desktop → Desktop
Select 'Desktop Wallpaper'
Select 'Enabled', then supply the wallpaper name (directory\filename).
Choose Wallpaper Style
Click OK
Wallpaper modification will take effect on the next login.
Setting Desktop Wallpaper using Registry Editor
Open the Registry Editor app.
Navigate to Policies in HKCU.
Right-click on Policies > New > Key.
Name it as System.
Right-click on System > New > String Value.
Name it as Wallpaper.
Double-click on it and enter the wallpaper path.
Right-click on System > New > String Value.
Name it as WallpaperStyle.
Double-click on it to set a Value data; the values below are valid:
0 - Center
1 - Tile
2 - Stretch
3 - Fit
4 - Fill
5 - Span
Click OK to save the change.
Wallpaper modification will take effect on the next login.
Removing the wallpaper
In case you want to remove this wallpaper, navigate to the following path:
HKEY_CURRENT_USER\SOFTWARE\Microsoft\Windows\CurrentVersion\Policies
And right-click on Policies > Delete. Then, confirm the change by clicking the Delete button again.
Helpful Commands and Procedures
Creating/extracting files with 7-Zip
Create or add to an archive:
7z a -p <zipfile name> <file(s) to add>
Create an archive, recursing the directory specified:
7z a -rp <zipfile name> <file(s) to add>
Extract the archive:
7z x <zipfile name>
Resurrecting a USB Stick
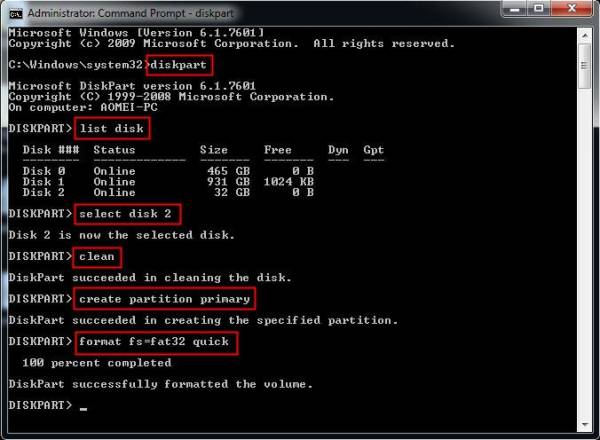
Connect your flash drive to the computer at first, and make sure it can be detected.
1. Click “start” and type “command prompt”.
2. Then, right click “command prompt” and select “run as administrator”.
3. After that, type “diskpart” and press “Enter”. Then execute the below commands in turn:
  list disk
  select disk n
  clean
  create partition primary
  format fs=fat32 quick: If you want to format to NTFS, type “format fs=ntfs quick”.
Bulk Installation of Programs
Visit www.ninite.com
Checking a file's hash
certutil -hashfile c:\Users\YourUserName\Desktop\wire.exe SHA256

